
Starting Out With Comet (Orbited) Part 2 - Installation and STOMP Posted on June 25, 2009 by Dave Fowler
In this part of the tutorial we will install and setup the server side of a Comet installation using the Orbited implementation. We'll also be using the MorbitQ STOMP server to handle message passing and we'll play around with STOMP/Comet setup using Orbited's STOMP Test demo. If you have not read the first blog post in this series I advise you do so. I will be assuming you have an understanding of those terms and concepts of the previous post for this tutorial.
Before we start I'd like to quote my source. I've learned most of what I'm sharing from Michael Carter's Tutorial and many hours of playing around.
Installation
We will need to install the latest version of Orbited and also some Stomp tools. The stomp tools aren't required for this step but will be for anything else you want to do with comet so I've included them in the installation steps here as well. Conveniently Orbited is setup in the Cheeseshop. You need python2.5+ and if you have not installed the python setup-tools do so now.
Installation simply consists of the following commands.
easy_install twisted
easy_install orbited
easy_install stompservice
easy_install simplejson
To test if it works enter your python shell and test importing the libraries. The following should load without any errors
$ python
import twisted import orbited import stompservice import simplejson
If you have any troubles there is more info on the Orbited Installation Guide.
Configuration
Orbited is configured with a '.cfg' file. Lets call ours example.cfg. Make a directory anywhere for your project and paste the following into example.cfg
[global]
session.ping_interval = 300

[listen]
http://:9000
stomp://:61613

[access]
* -> localhost:61613
Lets go through the different parts.
The ping interval is a number of seconds for the backend to wait before it pings the client. We've got it set up for 5 minutes. Good comet implementations have some sort of pinging system. This is a necessary step as due to current HTTP protocols the client cannot tell if something has gone wrong on the server end. It simply waits happily all day for some sort of response for the server. But with a pinging system setup we can tell the client to refresh its connection if it hasn't heard from the server in the last 300 seconds, and the server will make sure to ping the client at least every 300 seconds, letting it know that the connection is still alive.
The listen parameters tell the orbited server which ports to listen to and who to proxy requests to. In our configuration port 9000 will be serving static html files, and port 61613 will be a proxy for our STOMP server.
And finally, the access parameter gives permission to proxy to the stomp server.
Lets Run It
To run enter your project directory and type
orbited - -config example.cfg
It should look something like this:
06/24/09 21:05:24:651 INFO orbited.start proxy protocol active 06/24/09 21:05:24:511 INFO orbited.start Listening http@9000 06/24/09 21:05:24:525 INFO orbited.start Listening stomp@61613
STOMP Test
Orbited comes with a really nice STOMP demo that also serves as a nice tool for debugging your setup later. We'll use it to play around with Comet and understand the concepts behind STOMP.
While your orbited server is running visit the following URL.
http://localhost:9000/static/demos/stomp/
 There are 3 important tools/rows we'll be using here: Connect, Subscribe and Send.
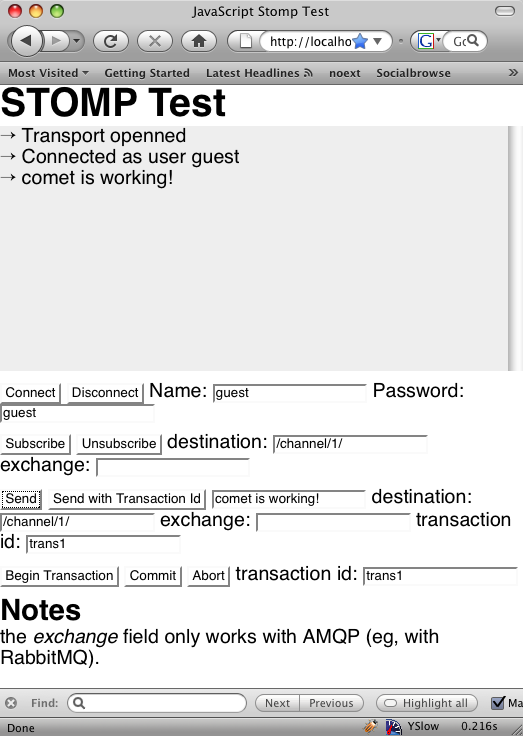
First click on "Connect" to connect to the orbited and stomp servers. We're using MorbitQ has the stomp client, which doesn't deal with authentication, so any name and password will work. Notice that the STOMP test shell will now say.
→ Transport openned → Connected as user guest
Second change the "destination" in the "Subscribe" row to be "/channel/1/" and click Subscribe. You have now created and subscribed to a channel called "/channel/1/".
Next we'll send something to that channel using the Send tool. Again change the destination to "/channel/1/" and type something into the message box replacing "hello". In the image above I've chosen "comet is working!". Now hit Send and notice that your message shows up in your STOMP shell!
Try sending to other destinations and notice that only messages sent to "/channel/1/" will show up in the stomp shell. We can change that however by subscribing to additional channels. Try subscribing to "/anotherchannel/" and then send it a message. Notice that this setup can handle being subscribed to many different channels at once.
The Real Power
All of the things we've tried so far could have been fairly easily implemented with simple AJAX. The real power of comet is that it can push information to the client without having to submit a request. Also, the real power of STOMP is that it smoothly handles message passing between clients. Lets demonstrate both of these now by opening up multiple browser windows all pointing to our STOMP Test.
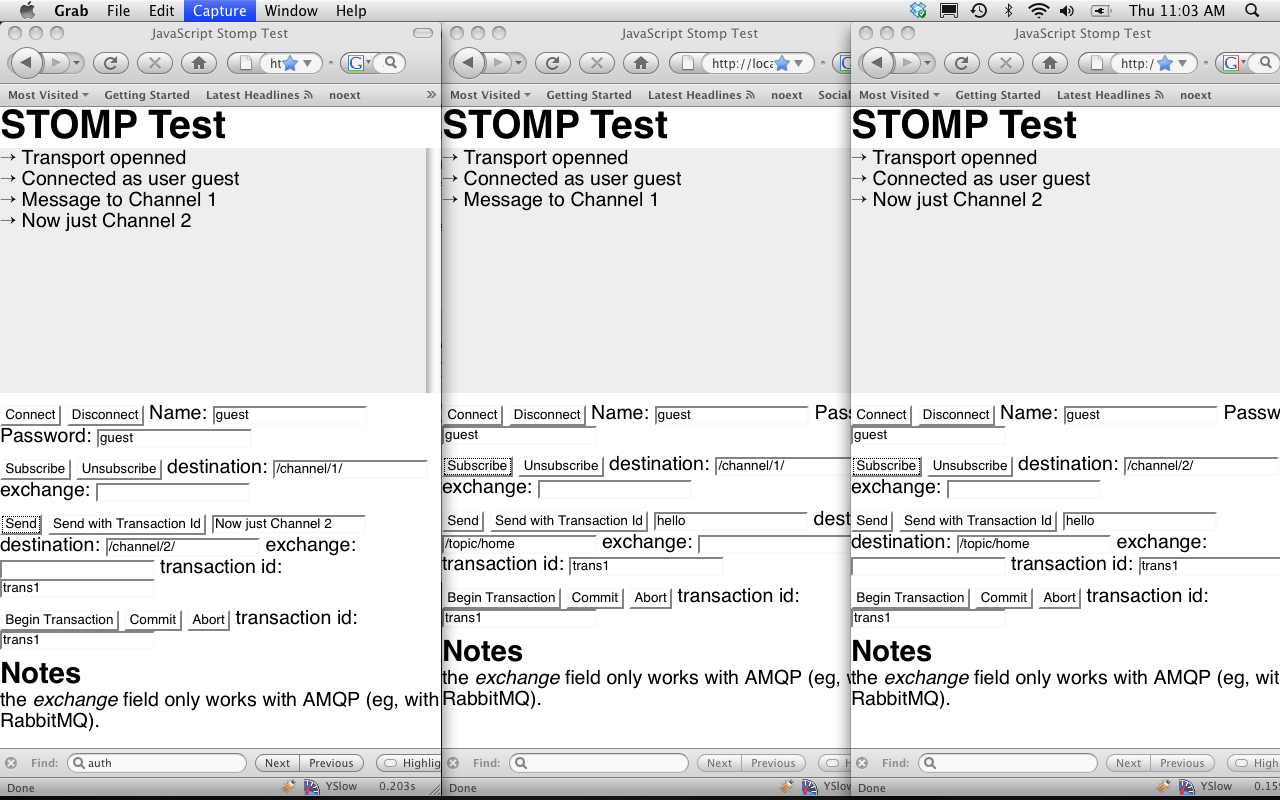 Open up 3 windows and "Connect" them each to the server. Now subscribe the second window to "/channel/1/", the third window to "/channel/2/" and the first window to both.
Once setup, using the first window send a message "Message to Channel 1" to "/channel/1/". You'll notice that it not only showed up instantly in window 1 (where you submitted), but also in window 2 (where you did nothing)! The STOMP server has passed the message all clients listening to "/channel/1/" and the Comet server has pushed it to the client without it having to poll for updates!
Now send a message to "/channel/2/" and notice that it shows up in windows 1 and 3, but not 2.
Play around with this setup more to become familiar. Each window can subscribe to any number of channels, and each can send messages to any channel, whether it is subscribed to it or not.
Whats Next
We've now setup and tested a Comet implementation. You can see its benefits and understand how it works with STOMP. In the next example we'll work on the client side of the Comet implementation and write a python STOMP client to handle processing and sending the data on a comet server.
In the mean time you may want to look at the other demo's that came with Orbited (at at http://localhost:9000/static/demos/) or Michael's Demo.
Update: Part 3 - The Client is now available.