
Appengine Example: Quick Thoughts Posted on July 21, 2009 by Dave Fowler
I've made a few apps on Google's Appengine now and am getting to the point where I can pump them out fairly quickly. I really love that they make user authentication (my least favorite part of web applications) incredibly simplified.
I wrote this app in less than an hour as a simple tool for myself and to test out the authentication tools which I hadn't gotten a chance to use yet. I'm sharing the source here in case its of any use to others.
Description
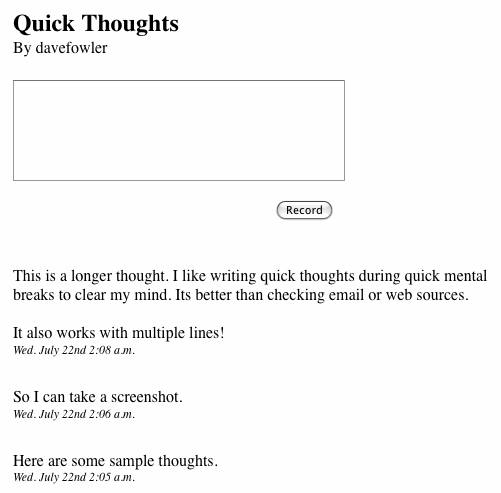
The app is called Quick Thoughts and its a very simple private micro blog (a private twitter). Basically you log in and can record quick notes to yourself. They're dated and only you can see them.
Its all on one page. You can get a good idea of what it is from this screen shot. You can also just try it out yourself by logging into: http://quoughts.appspot.com/
There are a lot of other Appengine tutorials including the official tutorial that do a very thorough job of explaining setting up a development environment and deploying. I'm just going to share some more example code with some helpful comments.
I know looking at code is not pretty, but I've included a lot of comments for each part. It should be easiest to understand in that format. Ugh: and I'm sorry that the crappy Wordpress syntax highlighting has totally f'd the format. That pretty much makes python code useless, but hopefully you'll be able to sift through.
Template
There are only three files for this app. The first is the HTML template for the single page that is used.
index.html
Quick Thoughts
By {{ user.nickname }}
{% for thought in thoughts %}
{{ thought.thought|linebreaksbr }}
{{ thought.date|date:"D. N jS g:i a" }}
{% endfor %}
This is all pretty straightforward especially if you come from the Django world. Appengine wisely uses Django's templating system to render its HTML pages. For more details on the templates view the Django .96 Template Documentation.
Request Handling
The second file is the python WSGI handler. You can ofcourse use Django on Appengine and have the advantage of the nice url parser and the Django views format but here I just stuck with the WSGI RequestHandlers.
thoughts.py
from google.appengine.api.urlfetch import fetch as urlfetch, GET, POST
from google.appengine.ext import db
from google.appengine.ext.webapp import RequestHandler, WSGIApplication
from google.appengine.ext.webapp import template
from google.appengine.api import users

import os

from wsgiref.handlers import CGIHandler

class Thought(db.Model):
 """
 This is the Database Model that stores the different Thought objects that the user submits
 Each entry in the database stores a thought, date and the user who wrote it.
 """
 thought = db.TextProperty()
 date = db.DateTimeProperty(auto_now_add=True)
 # The auto_now_add setting automatically adds the date that the object was created so you don't have to.
 user = db.UserProperty()  # Google handles the user for you.  Great!

class ThoughtHandler(RequestHandler):

 def get(self):
 user = users.get_current_user() # Get the user
 if not user:
 # If they are not logged in, ask google to authenticate them.
 self.redirect(users.create_login_url(self.request.uri))

 # These are the variables that will be sent to the template
 template_values = {
 # This is a GQL query for the appengine datastore.
 # Here we're finding all Thoughts for the given User and ordering them by Date descending
 # More info on GQL: http://code.google.com/appengine/docs/python/datastore/gqlreference.html
 'thoughts':  Thought.all().filter("user =", user).order('-date'),
 'user': user,
 }

 # Gather the full path to the template
 path = os.path.join(os.path.dirname(__file__), 'index.html')

 # Render the template with the template_values we collected above
 html = template.render(path, template_values)

 # Write out the result
 self.response.out.write(html)

 def post(self):
 """
 A Thought has been submitted via POST.
 Create a new Thought object and re-direct back to the front page.
 """
 user = users.get_current_user() # Get the user
 if not user:
 # If they are not logged in, ask google to authenticate them.
 self.redirect(users.create_login_url(self.request.uri))

 # Get the 'thought' POST data from the request
 thought = self.request.get('thought')

 # Create a new thought object using the POST data and the authed user
 t = Thought( thought = thought, user = user )
 # Save the object
 t.put()

 # Now re-direct back to the front page
 self.redirect('/')

def main():
 """
 This simple function is the URL parser
 There's only one URL for this app, so its a pretty bad example for this ;)
 """
 application = WSGIApplication([

 ('/', ThoughtHandler),

 ], debug=True)

 CGIHandler().run(application)

if __name__ == '__main__':
 main()
There are a few major highlights in this code: the Thought Datastore Model, the Query for your Thoughts, and the simple Google Authentication. I LOVE these three lines of code (yes, I know how nerdy that sounds):
user = users.get_current_user() # Get the user
if not user:
    self.redirect(users.create_login_url(self.request.uri))
In those 3 lines we've requested the User object and asked Google to authenticate them and send them back if they're not logged in! Super simple! No more login/signup/change password/change username crap to deal with here. The authentication is done for you.
Toward the top is the Thought model that is a subclass of db.Model. For those of you who're familiar with Django this format will look familiar. The Thought model contains the text of the thought, the date it was recorded and the user who recorded it.
In the 'get' Request we query for all of the thoughts of the given user and order them by descending date. The objects are fetched using GQL, the query interface for the Datastore. You can handle most queries by playing with the format of the above example, but here is more information on GQL.
Configuration
Finally we need the configuration file for our app. Its called app.yaml and it tells appengine what App we've registered as, and how to handle the URLs.
app.yaml
application: YOURAPPNAME
version: 1
runtime: python
api_version: 1

handlers:

- url: /.*
 script: thoughts.py
Other tutorials explain this file well. You can expand it to include other scripts and serve static files.
Conclusion
Now you have your own private micro-blog on Google's datastore! That means it's theoretically infinitely scalable without you ever having to worry about a thing. You can grow to the size of twitter and never blink an eye :).
Hope it helped some people. Feel free to use this code in any way you'd like and feel free to leave questions, comments or corrections.