
Starting Out With Comet (Orbited) Part 3 - The Client Posted on August 03, 2009 by Dave Fowler
Comet implementations require both server and client side components. In Part 2 of this series we installed and configured the server side component and then used the example STOMP Test client to test it out and get a feel for what was going on.
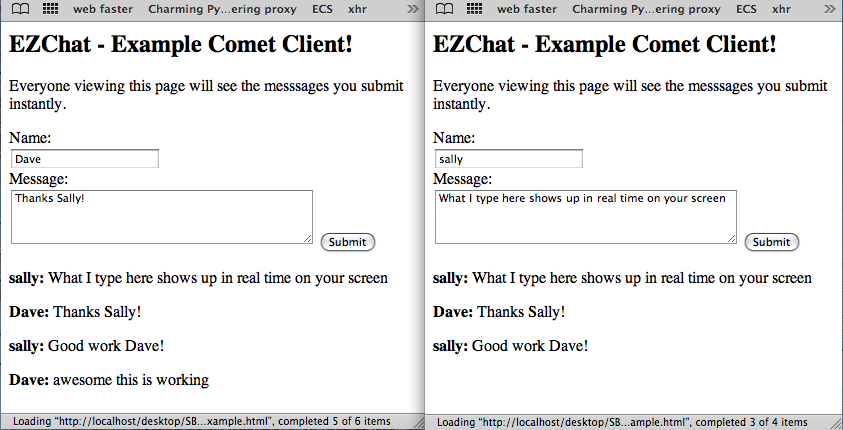
In this part of the series we'll be covering the client side to make our custom interface to the comet server. To demonstrate we'll go through the steps in creating an app I call EZChat which is basically a bare bones comet chat client. The interface will allow you to choose a name and submit messages that will be broadcast to everyone viewing the page in real time.
For it to work you will have to have the configuration of Part 2 setup and your Orbited server running. For reference I learned most of the client side code in this example by playing with the source of the example STOMP Test client at http://localhost:9000/static/demos/stomp/. I recommend taking a look at that source if you need more advanced options or another example.
Includes
At the top of the
you first need to include the libraries for the Orbited (/static/Orbited.js) and STOMP (/static/protocols/stomp/stomp.js) client-side implementations.<script>document.domain=document.domain</script>
<script src="http://localhost:9000/static/Orbited.js"></script>
<script>
Orbited.settings.port = 9000;
TCPSocket = Orbited.TCPSocket;
</script>
<script src="http://localhost:9000/static/protocols/stomp/stomp.js"></script>
<script src="http://www.json.org/json2.js"></script>In between the scripts we've set up a TCPScocket. It must be don between the two script includes because the STOMP library needs the socket setup for its execution. We've also specified the Orbited port which is necessary especially if you change the port on which the orbited and stomp javascript files are hosted on (they can both be hosted on port 80 along with your other scripts).
Lastly, we've also included a popular JSON library. Typically I use jquery-json but I've kept this tutorial free of javascript frameworks so as not to add unneeded complexity. If you'd like you can of course switch to whatever JSON library you're used to; just replace the JSON.stringify and JSON.parse functions with your equivalents.
STOMP Setup
Because we're dealing with the setup we'll skip to the bottom of the page and add the following script just before the end tag of the body ().
<script type="text/javascript">
(function() { // set up stomp client.
stomp = new STOMPClient();
stomp.onconnectedframe = function() { // Run on initial connection to STOMP (comet) server
stomp.ready = true;
// subscribe to channel CHANNEL = "/ezchat/"
var CHANNEL = '/ezchat/'
stomp.subscribe(CHANNEL);
};
stomp.onmessageframe = function(frame) { // Executed when a messge is received
my_receive( JSON.parse(frame.body) );
};
// Everything is setup. Start the connection!
stomp.connect(document.domain, 61613); //, 'guest', 'guest');
})();
</script>My apologies as always for the crappiness of the wordpress syntax parser. Lets walk through what's happening.
At the top, we initialize a new STOMPClient object. The StompClient has the following hooks you can override to trigger your own events.
onopen - Called when the Transport is opened onclose - Called when the Transport has closed onerror - Called when the Stomp Client has errored onerrorframe - Called when there is an error in the message received onconnectedframe - Called when a the client is fully set up for sending/receiving onmessageframe - Called when a message is received
The STOMP object also has these functions for connecting and resetting the connections.
reset - Resets the STOMP connection connect - Connects to the STOMP server send - Sends the object in the first argument to the channel specified by the second argument
In our simple example only the onconnectedframe and onmessage frames need to be overwritten.
The onconnectedframe function is called when the STOMP server has been connected to and everything is setup for sending and receiving messages. Inside this function we simply need to subscribe/listen to the CHANNEL we've setup for our chat. For the example I've chosen the channel '/ezchat/'. Once subscribed our STOMP client will receive any messages sent to that channel in real time. You can subscribe to multiple channels if you'd like, and you can make clients with different channels if you'd like to have different chat rooms. But for this example we'll just stick with the hard coded '/ezchat/' channel.
The onmesageframe function is called when a message has been received. It is passed a frame object with the following structure
frame
- body: "{"name":"Dave","message":"awesome this is working"}"
- headers: Object
* content-encoding: "utf-8"
* content-length: "51"
* content-type: "text/plain"
* destination: "/ezchat/"
* message-id: "/ezchat/_3"- type: "MESSAGE"
where the body holds the information that has been sent. The STOMP server and client add extra "type" and "headers" objects to communicate between each other. The extra information can be very useful for more complicated applications but for our simple example we're only interested in the frame "body".
So you see that the onmessageframe is simply parsing the json object in frame.body of every received message and passing it to my_receive, a function we will soon create.
The Content
For EZChat we need a form where users can specify a name and type messages to send. We also need an area to put the messages. Plop this HTML in at the top of the
to handle all of that.<h2>EZChat - Example Comet Client!</h2>
Everyone viewing this page will see the messsages you submit instantly.
<form action="#" id="message_form">
Name:
<input type="text" name="chat_name" id="chat_name"></input>
Message:
<textarea rows="4" cols="40" name="message" id="message"></textarea>
<input type="submit" name="Send" onclick="return my_send(); return false"></input>
</form>
<div id="messages"></div>There are a few things to notice here. First, the important elements in the form have ids 'chat_name' and 'message' and the area that will be containing all the received messages is called 'messages'. The names don't matter except that we'll use them in the functions we create later.
Second, the onclick event of the submit button is overridden with instead calling the my_send function. We'll make this function in the next step.
The Functions
Lastly we need to make the custom my_send and my_receive functions that get called to send and receive messages. Insert these functions into the head after the includes.
my_send
The my_send function will get the values from the 'chat_name' and 'message' form elements, combine them in an object, convert the object to json, and then sends it to the '/ezchat/' channel. The sending is handled using the stomp.send command which takes as input the object to send and second, the channel to send it to.
var CHANNEL = '/ezchat/';
function my_send() {
// Get the values to send from the form
var name = document.getElementById('chat_name').value;
var message = document.getElementById('message').value;
var msg = {'name': name, 'message': message};
var json_msg = JSON.stringify(msg);
stomp.send(json_msg, CHANNEL)
return false;
}my_receive
As discussed earlier the my_receive function gets the JSON parsed version of whatever was sent in 'frame.body'. In the case of our app its always an object of the format
msg = {'name':
The my_receive function simply takes this object and converts it into a prettier HTML format and appends it to the top of the message list we created in the HTML.
function my_receive( msg ) {
console.log('received message', msg);
// append the <msg> to the top of the list of messages.
var messages_el = document.getElementById('messages');
var new_message = "
<div><strong>" + msg['name'] + ":</strong> " + msg['message'] + "</div>
";
messages_el.innerHTML = new_message + messages_el.innerHTML;
}That's it for the code. Scroll to the bottom of the page for the full version of the source.
Results
Ensure that your Orbited server is running as described in Part 2 of the series. Then load up the page we've made in two or more separate windows. Choose a different name for each window and start sending each other messages. You'll notice that both windows will receive the submitted messages almost instantaneously! The beauty of Comet!
 If you open your STOMP Test Client at
 http://localhost:9000/static/demos/stomp/
and subscribe to the '/ezchat/' channel you'll see a more raw input on what's actually being received by the STOMP clients as you chat.
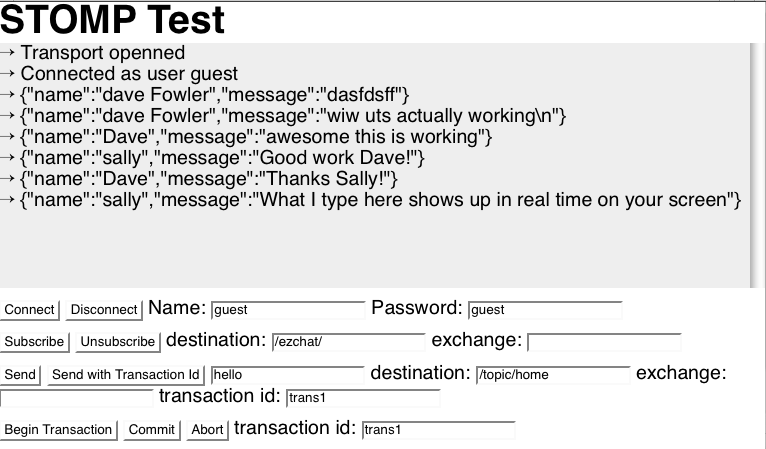 You can see how the STOMP Test client is incredibly handy for debugging.
That's it for this part of the Tutorial! There are still parts to come including writing a data handler on the server side and hopefully a much requested post on Django integration.
Full Source
For your convenience here's the full index.html file for this example.
<html>
<head>
<script>document.domain=document.domain</script>
 <script src="http://localhost:9000/static/Orbited.js"></script>
 <script>
 Orbited.settings.port = 9000;
 TCPSocket = Orbited.TCPSocket;
 </script>
 <script src="http://localhost:9000/static/protocols/stomp/stomp.js"></script>

 <script src="http://www.json.org/json2.js"></script>
<script type="text/javascript">
// These are our custom functions for sending and receiving STOMP messages.
// They will be sent in the format msg = {'name': somename, 'message': somemessage}
var CHANNEL = '/ezchat/';
function my_receive( msg ) {
 console.log('received message', msg);
 // append the <msg> to the top of the list of messages.
 var messages_el = document.getElementById('messages');
 var new_message = "
<div><strong>" + msg['name'] + ":</strong> " + msg['message'] + "</div>
";
 messages_el.innerHTML = new_message + messages_el.innerHTML;
 }
function my_send() {
// Get the values to send from the form
var name = document.getElementById('chat_name').value;
var message = document.getElementById('message').value;
var msg = {'name': name, 'message': message};
console.log(msg);
var json_msg = JSON.stringify(msg);
console.log(json_msg);
stomp.send(json_msg, CHANNEL)
return false;
}
</script>
</head>
<body>
<h2>EZChat - Example Comet Client!</h2>
<div>Everyone viewing this page will see the messsages you submit instantly.</div>
<form action="#" id="message_form">
Name:
<input type="text" name="chat_name" id="chat_name"></input>
Message:
<textarea rows="4" cols="40" name="message" id="message"></textarea>
<input type="submit" name="Send" onclick="return my_send(); return false"></input>
</form>
<div id="messages"></div>
<script type="text/javascript">
(function() { // set up stomp client.
stomp = new STOMPClient();
stomp.onconnectedframe = function() { // Run on initial connection to STOMP (comet) server
stomp.ready = true;
// subscribe to channel CHANNEL = "/ezchat/"
stomp.subscribe(CHANNEL);
};
stomp.onmessageframe = function(frame) { // Executed when a messge is received
console.log('frame is', frame);
my_receive( JSON.parse(frame.body) );
};
// Everything is setup. Start the connection!
stomp.connect(document.domain, 61613); //, 'guest', 'guest');
})();
</script>
</body>
</html>As usual, if there are corrections or questions please be sure to leave them in the comments. And remember to subscribe to catch the rest of the series.